With a long day ahead and few lunch choices near the airport, I made a sandwich detour. The woman behind the counter saw the cycling garb and asked where I had started and where I was headed. She was shocked, thinking it impossible or impractical to ride 16 miles to work in the morning and 16 miles home in the evening. I offered that I hadn't jumped into riding that sort of mileage, I eased into it. She claimed she could never ride a bike that far and I reminded her that each of us is capable of more than we realize.
Reaching the end of the 2013 and having completed my 56th lap around the sun, I find myself above my goal of 4500 cycling miles for the year. I've upped that goal to 6000 miles and with just under 5600 miles and a few weeks left to log the remaining 400 miles, I stopped to consider how far I'd come. With age comes wisdom and as I've grown older, my focus has shifted from my own needs to helping others. That sandwich shop chat got me thinking about what to suggest to readers who might want to undertake a bicycle commute, reduce their dependence on fossil fuel, shed some weight, improve their health, and generally feel more energetic about life.
1) Start Incrementally
First a disclaimer: Verify you are healthy enough to begin cycling by checking with your doctor or by getting a physical examination.
My commute routine started with a mile or so of cycling to BART, riding the train to a station near work, and cycling the remaining five miles. 12 miles round trip was tiring at first, so I'd alternate one day riding, one day driving. Often the train home was delayed and it began to dawn on me: If I could work up to cycling the whole way, I'd get home sooner. Occasionally I'd ride the whole way home. Then I began cycling to and from work and before I knew it, I had mostly abandoned BART. The key was starting with an intermodal solution and then gradually increasing my mileage. Try to do too much, too soon and you may give up before you've established the all important exercise habit pattern.
2) Find a Route
Most people say the number one reason they don't consider bicycling is the lack of separation from motor vehicles. Bike lanes, sharrows, and green lanes are great, but they don't guarantee protection from a collision with a car or truck. Mapping software like Google Maps or the interactive New York Times bike maps can help you discover a good route. Don't put your faith in any suggested route until you've verified it yourself. You may find that designated bike routes are actually less suitable than a routing you find yourself.
3) Form Good Habits
Exercising every day is a good way to ensure success, but realize that it can take as long as two or three months to work out the logistics and for the cycling habit to become engrained. Once you've established a pattern and worked out the kinks, driving to work will seem less and less appealing. If you have to spend time getting to work, why not spend some or all of that time doing something that will make you feel better?
What about arriving at work all sweaty? A lot depends on your circumstances, but with some planning and ingenuity those issues can be worked out. I carry two panniers: One is my flight bag containing my iPad mini, headset, and various supplies. The second pannier holds a change of clothes, a sweater, and my lunch. I use panniers because I don't like carrying things on my back while riding, but these solutions are individual in nature. Experiment and find what works for you.
4) Measure Your Progress
Regardless of your goal (sleep more, eat less, exercise more), you're more likely to succeed if you have a way to measuring your progress. I find the MapMyFitness iPhone app useful for tracking my weekly mileage and time spent riding. There are other apps and they all seem to have historical measurement and graphing tools. If, for example, you see your mileage increasing by more than one standard deviation, you're probably increasing your workouts too quickly.
5) Set Achievable Goals
Nothing will scuttle you faster than setting an overly ambitious goal. Better to set a less aggressive goal that you can meet or exceed. In my own case, I set a goal of riding 4500 miles for this year even though I suspected I could do more. When I met my goal early, I adjusted it upward. Time will tell if I make the 6000 mile mark, but I'll have fun in the process.
6) Pace Yourself
Once your exercise habit pattern is established, avoid being too aggressive with your routine. Americans live in an increasingly competitive, some might say militaristic, society. Don't fall victim to the mentality of "If a little exercise is good, then more must be better." Unless you're a comic book hero, over-training will lead to burn-out, injury, illness or just a bone-tired feeling that you can't shake. The flip side of exercise is rest: We all need rest. If you have entered your fourth decade or beyond on planet Earth, you're aware that you don't recover from injury as quickly as you used to. So be wise and avoid getting injured in the first place.
7) Expect the Unexpected
Regardless of your well-laid plans, illness, injury, saddle sores, over-training, and countless obstacles crop up for cycle commuters. If you've set a reasonable goal, you shouldn't have any trouble taking a few days off when you don't feel right or if you need time to heal.
You'll also need to be prepared for unexpected bike maintenance, usually a flat tire. Install puncture resistant tires, carry the necessary tools and supplies to fix a puncture, and have the skills to do the work. Knowing how to make simple repairs in adverse conditions will serve you well.
What about rain, snow, and other icky weather, you ask? California generally has benign weather compared to where I spent my formative years (Chicago area), but things can still get nasty. Rain, strong winds, and cold temperatures with high relative humidity provide plenty of reasons to throw in the towel and just drive. My motto: "There's no such thing as poor cycling weather, only poor preparation." Fenders, shoe covers, riding tights, insulated gloves, helmet covers, and good cycling lights (front and rear) are excellent investments. Get equipped, get over the hump, get out the door, and you'll find things are not as bad they seem.
A side benefit of cycling is that you will regularly encounter unexpected moments of beauty and awe. It could be wildlife, a breathtaking sunrise or sunset, the stillness of a gentle snow fall, or the mystery of a thick fog. Consider carrying a camera and recording what you see, share these inspiring moments with others, but by all means slow down, appreciate, and enjoy.
8) Manage Risks
Reducing risk on a bike boils down to being visible, wearing a helmet, and riding responsibly and defensively. It may not be fashionable, but bright clothing and lights (front and rear) reduce the risk you'll collide with a motor vehicle or pedestrian. If you find yourself resistant to wearing a helmet, ask yourself this: Do you want to experience a traumatic a brain injury when your noggin hits the pavement? Will you enjoy relearning the alphabet in a rehab facility while your significant other feeds you soup from a spoon? In addition to wearing a helmet, ride responsibly and follow the rules of the road. There's a difference between executing an Idaho Stop at a deserted intersection and acting like a selfish jerk in heavy traffic. Don't ride like a jerk!
9) Care for Your Ride
Once a week, clean your bike, check your tire pressure, oil your chain (if you're still using a chain), and check the condition of your brakes. A little preventative attention now can prevent a roadside repair at an inopportune time and location. I've learned this the hard way. Few things match the unwanted excitement of making a tire repair on a dark and lonely urban street in a pouring rain.
10) Be an Example for Others
When people you know or work with see you have adopted bicycle commuting, they may question your mental health. There's no need to try to sell others on the virtues of using a bike as transportation. The very fact that you arrive by bike and that you look and feel great is all the evidence others will need to adjust their commuting priorities.
Showing posts with label bike. Show all posts
Showing posts with label bike. Show all posts
Sunday, December 1, 2013

Sunday, November 24, 2013
In Praise of the Bell
There are unfortunate trends in bicycling such as wearing dark clothing, cycling at night without lights and without a helmet, riding on the wrong side of road, and rude disregard for traffic laws, but few are as disturbing as cyclists who eschew the use of a bicycle bell. Some cyclists may feel that having a bell on their bike is emasculating or childish, but that's simply not true. Bike bells come in a dizzying array of sizes, shapes and timbre and more cyclists should be using them because bells are powerful.
Bikes and pedestrians often share pathways in European countries and they have bicycle regulations requiring bicycles have certain equipment. In Germany the Straßenverkehrszulassungsordnung, or road traffic permit regulations, requires certain equipment, including a helltönenden klingel or high-toned bell. In the US, bicycle regulations vary from state to state. Compared to the StVZO, California doesn't require much bicycle equipment at all. And California law does not require a bicycle bell.
What is so important about a bell? When riding on multi-use paths or in the city, ringing a bell to alert pedestrians and other cyclist to your presence is good etiquette. Okay, many people young and old can barely spell etiquette and even fewer know what it means, but the power of a tiny bell can change all that.
With a bell, there's no need to yell "passing on your left" or "heads up" or "haul ass!" Instead, you let the sound of the bell speak for you. The pleasant, ringing isn't at all like a honking horn and carries few of the negative connotations. The bell says, politely, "I'm behind you and would like to pass." With more bike bells in the US, more Americans would remember or come to understand what the sound means. With more bike bells, Americans could become more cooperative and less contentious. If you don't have a bell on your bike, why not get one and start a re-evolution?
 |
| StVZO required equipment |
Bikes and pedestrians often share pathways in European countries and they have bicycle regulations requiring bicycles have certain equipment. In Germany the Straßenverkehrszulassungsordnung, or road traffic permit regulations, requires certain equipment, including a helltönenden klingel or high-toned bell. In the US, bicycle regulations vary from state to state. Compared to the StVZO, California doesn't require much bicycle equipment at all. And California law does not require a bicycle bell.
- Helmet for persons under 18 years of age
- Handlebars
- An attached seat
- For Night Riding
- White headlamp, attached to the bicycle or your body
- Red rear reflector
- White or yellow reflectors on front and back of each pedal
- White or yellow reflectors usually mounted on wheel spokes
- If you have tires front and rear with reflecting sidewalls you do not need side reflectors
What is so important about a bell? When riding on multi-use paths or in the city, ringing a bell to alert pedestrians and other cyclist to your presence is good etiquette. Okay, many people young and old can barely spell etiquette and even fewer know what it means, but the power of a tiny bell can change all that.
With a bell, there's no need to yell "passing on your left" or "heads up" or "haul ass!" Instead, you let the sound of the bell speak for you. The pleasant, ringing isn't at all like a honking horn and carries few of the negative connotations. The bell says, politely, "I'm behind you and would like to pass." With more bike bells in the US, more Americans would remember or come to understand what the sound means. With more bike bells, Americans could become more cooperative and less contentious. If you don't have a bell on your bike, why not get one and start a re-evolution?
Tuesday, November 5, 2013
TTCBCOAB, the Door Lane, and Seeing the Light
I work Saturdays, so weekends tend to be busy. Cramming all the chores into Sunday (and sometimes Monday) is a challenge, especially without using a car. Or is it? By riding a bike, parking is certainly easier. It's possible to (carefully) scoot past a long line of cars queued up at a stop sign or stop light. You arrive at your destination invigorated and in a better mood. And most importantly, you naturally avoid trying to do too much, getting in a rush, and becoming impatient with others. Perhaps life on a bike is generally better than life in a car.
Bike Lane or Door Lane
Oakland, Berkeley, Alameda and other East Bay cities continue to add new facilities for cyclists. One of the easiest things cities can do is add sharrows: Pavement markings that alert drivers to the presence of bikes. Sometimes signs are added to remind drivers that bicycles may use an entire lane of traffic. In Oakland, several bike lanes are being augmented with a green stripe painted on the pavement to make the bike area clearer. This is good stuff, but there are complications.
Often the "sharrows" and the green stripes are positioned to the right of the center of the lane, putting cyclists close to a row of parallel-parked cars. How much distance is required for a cyclist to avoid hitting a car door that is suddenly thrown open? After watching these two videos, you may think twice about assuming 3 feet of separation from parked cars is sufficient to "avoid the door." A word of warning, the second video is pretty startling.
Seeing the Light
One strategy for avoiding car doors and accidents in general is to use a flashing headlight, even during daylight hours. My commuter bike's dynamo-powered front and rear lights are on anytime my bike's wheels are turning, day or night. I supplement these steady-burning lights with flashing lights, front and rear. Countless times, the flashing front light has alerted drivers who were about to open their car doors and saved me from certain harm. And at least once a week, a pedestrian, driver, or another cyclist informs me "Hey, your lights are on!" My response varies from day-to-day, usually just a polite "Thank you," unless the person pointing it out is another cyclist. In that case I point out, "Hey, you don't have any lights!"
It may be very un-hip, but wearing bright colors like a florescent green, orange, or pink vest or jacket when riding is an easy way to reduce the risks associated with cycling. NHTSA and CDC have some good information on cycling safely and they both emphasize the importance of being visible.
So reducing cycling risks really be boiled down to four basic principles:
 |
| TTCBCOAB #61, Four bags of groceries, new bike clothes |
 |
| TTCBCOAB #62, Case of canned dog food, bag of kibble, biscuits |
 |
| TTCBCOAB #63, Raised veggie bed fencing, donated by a friend |
Oakland, Berkeley, Alameda and other East Bay cities continue to add new facilities for cyclists. One of the easiest things cities can do is add sharrows: Pavement markings that alert drivers to the presence of bikes. Sometimes signs are added to remind drivers that bicycles may use an entire lane of traffic. In Oakland, several bike lanes are being augmented with a green stripe painted on the pavement to make the bike area clearer. This is good stuff, but there are complications.
Often the "sharrows" and the green stripes are positioned to the right of the center of the lane, putting cyclists close to a row of parallel-parked cars. How much distance is required for a cyclist to avoid hitting a car door that is suddenly thrown open? After watching these two videos, you may think twice about assuming 3 feet of separation from parked cars is sufficient to "avoid the door." A word of warning, the second video is pretty startling.
Seeing the Light
One strategy for avoiding car doors and accidents in general is to use a flashing headlight, even during daylight hours. My commuter bike's dynamo-powered front and rear lights are on anytime my bike's wheels are turning, day or night. I supplement these steady-burning lights with flashing lights, front and rear. Countless times, the flashing front light has alerted drivers who were about to open their car doors and saved me from certain harm. And at least once a week, a pedestrian, driver, or another cyclist informs me "Hey, your lights are on!" My response varies from day-to-day, usually just a polite "Thank you," unless the person pointing it out is another cyclist. In that case I point out, "Hey, you don't have any lights!"
It may be very un-hip, but wearing bright colors like a florescent green, orange, or pink vest or jacket when riding is an easy way to reduce the risks associated with cycling. NHTSA and CDC have some good information on cycling safely and they both emphasize the importance of being visible.
So reducing cycling risks really be boiled down to four basic principles:
- Wear a helmet
- Be visible by using flashing lights and wearing bright clothing
- Ride predictably and courteously
- Stay alert and expect the unexpected
Thursday, September 5, 2013
Cycling the New Bay Bridge

Rules, Rules, Rules
Local TV news reporters, always looking for drama, claimed in a story last night that bicyclists are exceeding the 15 MPH speed limit on the new path. I can say that bike speed is not a problem westbound due to the uphill climb and the prevailing winds. Controlling your bike speed when eastbound can be a challenge given the inevitable tailwind, the downward incline, and the fact that many cyclists don't have bike computers or any objective measure of their speed. I was riding my brakes on most of my return trip (eastbound). When I got home, I checked MapMyRide and found that I actually exceeded the 15 MPH limit, reaching a top speed of 17.2 MPH at one point. My bad.

On my 1 hour visit I saw hundreds of cyclists and pedestrians, I didn't observe any cyclists going excessively fast. I did see numerous CHP officers on bike (I said "Hi" but most were not very friendly). I also saw many users blithely ignoring the trail markings of where pedestrians should walk and where cyclists should travel. Are Americans generally so clueless? Sadly, it seems many of us are clueless. When given instructions on what to do, many of us just do as we please, apparently insisting that liberty and freedom relieve us of any responsibility to be good citizen and to occasionally think of others. Ah, America!
Trail to Somewhere
As it stands, the Zuckermann path does not go all the way to Treasure Island/Yerba Buena. Being that the path is on the southeast side of the bridge, the old bridge is in the way of constructing a landing for the path. The completion of the landing is scheduled within a year or two, depending on who you talk to. Even as it currently exists, the path is well worth a short bike ride or longish hike. Not only for the views, but for a close up look at both the new structure and the old bridge.


The temporary ramp to the bridge is constructed of wood with a steel plate overlay.


Gleaming White and Graceful
I heard an architecture critic say on the radio last week that the new Bay Bridge span was okay, but didn't have the iconic beauty of the Golden Gate. I disagree because these two bridges came from different generations. I find the arcing arrangement of cables and the single tower to be ... dare I say it ... breathtaking. Riding back to Oakland, I found myself marveling at the amazing contributions we can make to our communities and to generations yet-to-come, once we find a way to cooperate, roll up our sleeves and get to work. Consider the tens of thousands of person-hours that went into the design and construction of this structure or just stop and enjoy the view, but by all means do visit the Zuckerman path. Remember that the process of dismantling the old cantilever span will start soon, so you may want to get a last look at the old bridge before it's gone. Like me, you may find yourself realizing you are two-thirds of the way to reaching San Francisco and conclude that continuing the path the rest of the way is a no-brainer.

Wednesday, September 4, 2013
Throwing off the Chain
After five thousand-plus miles of belt-drive bicycling, I wanted to share my experiences with a Rohloff equipped Proletariat (my primary commuter) and a Shimano Nexus equipped Bike Friday Tikit. Belt-drive technology and internally-geared hubs promise lower maintenance, quiet operation, flexible gear shifting, and freedom from oily/greasy chains. With a few caveats, I've found these advantages to be real and have been very pleased with belt-drive technology. I know there are many in the cycling community who have rejected internally-geared hubs (IGHs) in general and belt-drive bikes in particular. Whether or not the advantages of IGH/belt-drive will be realized for you depends on several factors. I'll start with my experience with the Bike Friday Tikit and conclude with the Rohloff-equipped Proletariat.
CDrive versus Gates
When I purchased the Bike Friday Tikit, I opted for lower-priced CDrive-equipped model and that was a mistake. The CDrive worked for a while, but after about 300 miles I found the belt slipping when pulling away from a stop in a slightly higher-than-normal gear. The belt "snubber" that held the belt firm against the rear pulley (meant to prevent this behavior) actually seemed to cause the belt to deteriorate. After 500 miles of use the, belt slippage became too annoying and I had the good folks at Cycle Monkey replace the CDrive with Gates Center Track pulleys and belt. Changing to the Gates components meant replacing the crankset, but I was able to re-purpose that crankset on my Prole. With the Gates equipment installed, the belt slipping stopped. If I had it to do over again, I would pony up the extra cash for the Gates belt-drive from the get-go.

Shimano Nexus
I originally had an 8-speed Alfine on my Prole and still have an 8-speed Nexus on the Tikit. My conclusion is that the Shimano 8-speed hubs (I have no experience with the 11-speed Shimano Alfine) are not ideal for belt-drive applications. Belts require tension and perhaps it is that force that causes Shimano's internally-geared hubs (IGHs) to make unhappy noises. And then there are occasional missed shifts, occasional slipped shifts, and the general feeling that things are not right. My theory? The Shimano design uses a large diameter roller bearing on the drive side and it isn't up to the stress that the belt tension produces. The Rohloff uses sealed bearings on both the drive and non-drive sides. A heavier, but more robust and reliable design.
I can live with these shortcomings on the Tikit for shorter, intermodal style transportation. I seldom ride the Tikit more than 8 or 10 miles at a time, but when I do ride farther the Shimano Nexus really starts to bug me. With the CDrive set-up, the ride characteristics became intolerable. With the Gates equipment and the Nexus, the Tikit is quite usable. I'd like to put a Rohloff on the Tikit, but will have to keep saving for that upgrade.
Proletariat, mit Rohloff
On the brighter side, my Rohloff-equipped Prole has turned out to be everything I hoped it would be. After over 4,000 miles of cycling pleasure, it is difficult to describe the Rohloff without using superlatives. The Rohloff SpeedHub is rock-solid, bullet-proof, solidly-engineered, confidence-inspiring, ultra-reliable. The Rohloff is more expensive than the Shimano IGHs, but it's in a totally different class.
After a year, I experienced stripped axle threads on the non-drive side of the Rohloff caused by a slightly too-short axle for the Prole's thick dropouts. That was quickly fixed, under warranty.
I noticed after 300 miles or so of use that the belt would start to become a bit noisy, making a slight squeaking/whirring noise. To stop the noise, I had tweak the belt tension every 300 miles or so. The culprit turned out to be rear axle slippage in the horizontal dropouts. Reinstalling the original tensioning nut that I had removed from the drive side was the solution. If you have a frame with horizontal dropouts and are using a belt-drive, I suggest using a drive-side tensioned arrangement such as the Surly Tuggnut.

Another issue was the bearing seal on the drive side began to weep a small amount of oil after about 3,500 miles of use. Again, that problem was fixed under warranty and has not returned. The leak may have been caused by me running a bit too much tension on the belt. It took quite a while to clean the mess off of the Gates belt with mild soap and water!
Good Tension, Good Alignment
Many bike mechanics tension Gates belts solely by feel. I like the Gates iPhone App because it lets you set the tension by plucking the belt like a guitar string and reading the vibrational frequency. You'll need a quiet environment and a bit of patience. Avoid too much tension. I suspect that might lead to the aforementioned bearing seal problem.
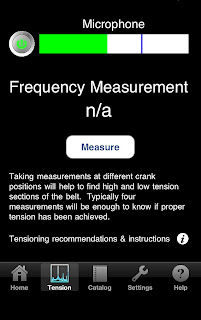

I've also discovered that the rear wheel alignment needs to be pretty precise if you want quiet belt operation and consistent tension across the rotation of the belt and crankset. I currently tension the belt on my Prole to about 45Hz with good results.
Bicycling Unchained
What's the best part of having a well-maintained and properly-adjusted belt drive bike? Belt-drive bikes are uncannily quiet and smooth, especially with the Rohloff. Be sure you have a bell on your bike that you can ring as a courtesy to pedestrians who might not hear you approaching. When it comes to Rohloff versus Shimano, I've become a SpeedHub evangelist: The Rohloff is not just a little bit better, it's a whole lot better. You get what you pay for and in my book, the Rohloff Speedhub is worth the cost.
CDrive versus Gates
When I purchased the Bike Friday Tikit, I opted for lower-priced CDrive-equipped model and that was a mistake. The CDrive worked for a while, but after about 300 miles I found the belt slipping when pulling away from a stop in a slightly higher-than-normal gear. The belt "snubber" that held the belt firm against the rear pulley (meant to prevent this behavior) actually seemed to cause the belt to deteriorate. After 500 miles of use the, belt slippage became too annoying and I had the good folks at Cycle Monkey replace the CDrive with Gates Center Track pulleys and belt. Changing to the Gates components meant replacing the crankset, but I was able to re-purpose that crankset on my Prole. With the Gates equipment installed, the belt slipping stopped. If I had it to do over again, I would pony up the extra cash for the Gates belt-drive from the get-go.

Shimano Nexus
I originally had an 8-speed Alfine on my Prole and still have an 8-speed Nexus on the Tikit. My conclusion is that the Shimano 8-speed hubs (I have no experience with the 11-speed Shimano Alfine) are not ideal for belt-drive applications. Belts require tension and perhaps it is that force that causes Shimano's internally-geared hubs (IGHs) to make unhappy noises. And then there are occasional missed shifts, occasional slipped shifts, and the general feeling that things are not right. My theory? The Shimano design uses a large diameter roller bearing on the drive side and it isn't up to the stress that the belt tension produces. The Rohloff uses sealed bearings on both the drive and non-drive sides. A heavier, but more robust and reliable design.
I can live with these shortcomings on the Tikit for shorter, intermodal style transportation. I seldom ride the Tikit more than 8 or 10 miles at a time, but when I do ride farther the Shimano Nexus really starts to bug me. With the CDrive set-up, the ride characteristics became intolerable. With the Gates equipment and the Nexus, the Tikit is quite usable. I'd like to put a Rohloff on the Tikit, but will have to keep saving for that upgrade.
Proletariat, mit Rohloff
On the brighter side, my Rohloff-equipped Prole has turned out to be everything I hoped it would be. After over 4,000 miles of cycling pleasure, it is difficult to describe the Rohloff without using superlatives. The Rohloff SpeedHub is rock-solid, bullet-proof, solidly-engineered, confidence-inspiring, ultra-reliable. The Rohloff is more expensive than the Shimano IGHs, but it's in a totally different class.
 |
| Proletariat, with recently added drop bars |
After a year, I experienced stripped axle threads on the non-drive side of the Rohloff caused by a slightly too-short axle for the Prole's thick dropouts. That was quickly fixed, under warranty.
I noticed after 300 miles or so of use that the belt would start to become a bit noisy, making a slight squeaking/whirring noise. To stop the noise, I had tweak the belt tension every 300 miles or so. The culprit turned out to be rear axle slippage in the horizontal dropouts. Reinstalling the original tensioning nut that I had removed from the drive side was the solution. If you have a frame with horizontal dropouts and are using a belt-drive, I suggest using a drive-side tensioned arrangement such as the Surly Tuggnut.

Another issue was the bearing seal on the drive side began to weep a small amount of oil after about 3,500 miles of use. Again, that problem was fixed under warranty and has not returned. The leak may have been caused by me running a bit too much tension on the belt. It took quite a while to clean the mess off of the Gates belt with mild soap and water!
Good Tension, Good Alignment
Many bike mechanics tension Gates belts solely by feel. I like the Gates iPhone App because it lets you set the tension by plucking the belt like a guitar string and reading the vibrational frequency. You'll need a quiet environment and a bit of patience. Avoid too much tension. I suspect that might lead to the aforementioned bearing seal problem.


I've also discovered that the rear wheel alignment needs to be pretty precise if you want quiet belt operation and consistent tension across the rotation of the belt and crankset. I currently tension the belt on my Prole to about 45Hz with good results.
Bicycling Unchained
What's the best part of having a well-maintained and properly-adjusted belt drive bike? Belt-drive bikes are uncannily quiet and smooth, especially with the Rohloff. Be sure you have a bell on your bike that you can ring as a courtesy to pedestrians who might not hear you approaching. When it comes to Rohloff versus Shimano, I've become a SpeedHub evangelist: The Rohloff is not just a little bit better, it's a whole lot better. You get what you pay for and in my book, the Rohloff Speedhub is worth the cost.
Monday, August 19, 2013
Bike Friendly, Bike Aware
When asked what keeps them from bicycling, most people complain of a lack of bike routes completely separate from automobile traffic. How to safely integrate cars and trucks with pedestrians and bikes is a challenge that some cities handle better than others. I've recently had the good fortune to visit two US cities that have good reputations in the bicycling world. I blogged about Boulder, Colorado last month and I just returned from Seattle, Washington. What I saw led me to conclude that some cities succeed in being bike friendly while many cities are just bike aware.
Seattle Bike Rental
I'd considered bringing my folding bike for my visit to Seattle, but the logistics didn't work out. So I did some research before visiting The Bicycle Repair Shop, a repair shop that caters to bicycle commuters but is well-stocked with high-quality bike accessories and a nice fleet of rental bikes.

They offer two basic rental models - a hybrid model with flat handlebars and beefier tires or a road bike with drop bars. I saw some of the hills I was going to climb and opted for the lighter-weight Giant with drop bars. The shop staff even helped me attach the waterproof iPhone bike mount I had brought with me. As I headed out on my adventure to Discovery Park for a dry run of Google Maps on the iPhone (now with bike directions!), I did wish the bike had been equipped with fenders. A light rain would be falling during much of the day's 43 mile ride and fenders would have kept me a bit cleaner.

Navigating Seattle by Bike
The Seattle Bicycle Club offers some nice bike routes with maps that I used to formulate a plan: I'd ride along the Elliott Bay Trail on the western edge of central Seattle, then head north through the Magnolia District to Discovery Park and onto the West Point Lighthouse. Along the way, I'd find some espresso, then head back to the Capitol Hill and cross the I-90 bridge to circumnavigate Mercer Island.
Getting to the Magnolia District from Elliot Bay is a bit hair-raising. There is a multi-use trail that gets you most of the way, but then you're on surface streets, some marked with sharrows and bike lanes, but many without. Most drivers appear to be aware of bikes and treat cyclists with deference, but crossing some of the roads and bridges is not without risk.
The aforementioned waterproof iPhone bike mount was a big help in navigating, though water puddles tended to accumulate around the button for the phone's home key. My only real gripe was that the iPhone's battery is not up to the task of acting as a bicycle-based GPS for more than an hour or so. Several supplemental battery options are available, but I hadn't availed myself of any so I stopped periodically and charged my phone at various cafes.

Seattle is known for coffee, but as a self-confessed coffee snob I found some of the offerings I sampled to be lacking. Not so with Uptown Espresso, where I stopped on my way to Discovery Park. They bill themselves as the "home of the velvet foam," but I had a double espresso sans milk. Nicely done.
Discovery Park
Like San Francisco's Presidio, Discovery Park was a military installation (Fort Lawton) that was decommissioned and repurposed, mostly. Several of the buildings appear vacant, but the roads now serve as multi-use paths in a park setting, free of cars. Given that it was a weekday, I found the area had a quiet, almost deserted feel.

Heading down a steep hill, you can make your way to the West Point Lighthouse. There you'll find more deserted buildings and a well-maintained lighthouse building. While there, I noticed a seaplane flying low over the water in the rain and mist.


After heading back through Seattle, I rode some of the city streets. Seattle has many designated bike lanes and sharrow lanes, probably more than most big US cities. Still, you are close to auto traffic, often on steep hills. Nothing can ameliorate the risk of a car-auto accident except sharp vision, good situational awareness, and fast reflexes. Most drivers are aware of cyclists, but that doesn't stop cars from commandeering a designated bike lane for their own purposes.
On my way to Mercer Island, I felt safer once I was on the multi-use path that leads to the I-90 tunnel and bridge. Unlike other communities, the I-90 tunnel was designed so that it is not shared with motor vehicles and that, frankly, makes a huge difference.

The trip around Mercer Island was mostly uneventful, though Google Maps got confused about what constitutes a bike path and what is a trail. There are some designated bike lanes and some separate multi-use paths, lots of trees and shade, and generally quiet streets.
Mostly Separate ...
The next day the weather was much drier and so I decided to make my way from Central Seattle to Alki Beach in West Seattle. Taking the Elliott Bay Trail south you head through a lot of construction with several bike path detours, some clearly marked, others not so much.

It could be my imagination, but it seems like the diesel trucks that shuttle about the port are not as clean-burning as those found in the Bay Area. When transiting an industrial area, there's not a lot you can do about air quality.
The signs to the Alki Trail are pretty extensive, which is good because you have to make your way through a maze of turns, street crossings, and switchbacks. Google Maps handled the circuitous route very nicely and I was glad I had it for reference. Eventually I found the entrance to the West Seattle bike bridge, complete with a electronic, bike-counting sign.


Once across the bridge, the multi-use Alki Trail becomes much quieter and less industrial. As I followed the trail around to the Alki Bath House, I was reminded of the Marina in San Francisco. It was a beautiful day and there were many trail users about, some more situationally aware than others.


Seattle Bike Rental
I'd considered bringing my folding bike for my visit to Seattle, but the logistics didn't work out. So I did some research before visiting The Bicycle Repair Shop, a repair shop that caters to bicycle commuters but is well-stocked with high-quality bike accessories and a nice fleet of rental bikes.

They offer two basic rental models - a hybrid model with flat handlebars and beefier tires or a road bike with drop bars. I saw some of the hills I was going to climb and opted for the lighter-weight Giant with drop bars. The shop staff even helped me attach the waterproof iPhone bike mount I had brought with me. As I headed out on my adventure to Discovery Park for a dry run of Google Maps on the iPhone (now with bike directions!), I did wish the bike had been equipped with fenders. A light rain would be falling during much of the day's 43 mile ride and fenders would have kept me a bit cleaner.

Navigating Seattle by Bike
The Seattle Bicycle Club offers some nice bike routes with maps that I used to formulate a plan: I'd ride along the Elliott Bay Trail on the western edge of central Seattle, then head north through the Magnolia District to Discovery Park and onto the West Point Lighthouse. Along the way, I'd find some espresso, then head back to the Capitol Hill and cross the I-90 bridge to circumnavigate Mercer Island.
Getting to the Magnolia District from Elliot Bay is a bit hair-raising. There is a multi-use trail that gets you most of the way, but then you're on surface streets, some marked with sharrows and bike lanes, but many without. Most drivers appear to be aware of bikes and treat cyclists with deference, but crossing some of the roads and bridges is not without risk.
The aforementioned waterproof iPhone bike mount was a big help in navigating, though water puddles tended to accumulate around the button for the phone's home key. My only real gripe was that the iPhone's battery is not up to the task of acting as a bicycle-based GPS for more than an hour or so. Several supplemental battery options are available, but I hadn't availed myself of any so I stopped periodically and charged my phone at various cafes.

Seattle is known for coffee, but as a self-confessed coffee snob I found some of the offerings I sampled to be lacking. Not so with Uptown Espresso, where I stopped on my way to Discovery Park. They bill themselves as the "home of the velvet foam," but I had a double espresso sans milk. Nicely done.
Discovery Park
Like San Francisco's Presidio, Discovery Park was a military installation (Fort Lawton) that was decommissioned and repurposed, mostly. Several of the buildings appear vacant, but the roads now serve as multi-use paths in a park setting, free of cars. Given that it was a weekday, I found the area had a quiet, almost deserted feel.

 |
| FAA/ATC Radar site at Discovery Park |


 |
| One mile vis and clear of clouds? Perhaps ... |
On my way to Mercer Island, I felt safer once I was on the multi-use path that leads to the I-90 tunnel and bridge. Unlike other communities, the I-90 tunnel was designed so that it is not shared with motor vehicles and that, frankly, makes a huge difference.
 |
| Tunnel, Eastbound |
 |
| Tunnel, Westbound |

The trip around Mercer Island was mostly uneventful, though Google Maps got confused about what constitutes a bike path and what is a trail. There are some designated bike lanes and some separate multi-use paths, lots of trees and shade, and generally quiet streets.
 |
| Attention Google, a trail at the top of a driveway is not a road! |
 |
| Bike route? WTF Google! |
The next day the weather was much drier and so I decided to make my way from Central Seattle to Alki Beach in West Seattle. Taking the Elliott Bay Trail south you head through a lot of construction with several bike path detours, some clearly marked, others not so much.

It could be my imagination, but it seems like the diesel trucks that shuttle about the port are not as clean-burning as those found in the Bay Area. When transiting an industrial area, there's not a lot you can do about air quality.
The signs to the Alki Trail are pretty extensive, which is good because you have to make your way through a maze of turns, street crossings, and switchbacks. Google Maps handled the circuitous route very nicely and I was glad I had it for reference. Eventually I found the entrance to the West Seattle bike bridge, complete with a electronic, bike-counting sign.


Once across the bridge, the multi-use Alki Trail becomes much quieter and less industrial. As I followed the trail around to the Alki Bath House, I was reminded of the Marina in San Francisco. It was a beautiful day and there were many trail users about, some more situationally aware than others.


Bike Aware and Pretty Friendly
My conclusions about Seattle, albeit drawn from a visit during pretty good summer weather, is that it is a very bike aware city that is well on its way to becoming truly bike friendly. There's a dedicated group of cyclists, cycling organizations, and city leaders who have made many improvements and accommodations for non-motorized vehicles. If you find yourself in Seattle, why not visit The Bicycle Repair Shop, rent a bike and helmet, and see for yourself?

Subscribe to:
Posts (Atom)